Life..a miracle

Life..a miracle

Friday, November 15, 2013

Diwali Recap

I cant seem to believe that Diwali is already over. The best thing with Diwali this time was it coincided with the weekend and that made things easier. We had a lovely time with friends and family through all the days of Diwali.

I decided to invite some of girlfriends over for a Mehendi party. Mainly a get-together for all us chattery heads with some food and a way to tease our creative minds. Since it was a working day, I had my menu planned in advance and decided to make things that were quick and easy to prep. I made dhokla using an instant mix, pav bhaji as the main meal and cassata for desert. The combination was perfect for a fun evening where me the host had ample time to spend with my guests without worrying much about managing it. I got the cassata set the night before and only had to cut the slices in the afternoon. Sadly in all the excitement of having friends over, I didn't click any pictures of my food. But I would like to highlight that the cassata was tried based on this recipe by Nupur, on her lovely blog. I have made it twice so far and it is a crowd-pleaser for sure!


All through the Diwali weekend, we had get-togethers each evening, and I was cooking two out of three times. On the day of Laxmi Pujan, we had our close family over for puja and dinner and I went with an authentic Maharashtrian menu. We had Cauliflower-peas sautéed in spices, Kakadichi pachadi(Cucumber raita), Tomatoche Saar(Spiced Tomato Soup), Jeera rice (Rice seasoned with cumin), Chapatis and Dry-fruit Shrikhand.

I have made Shrikhand before the lazy way. i.e. not by running the sugar n yogurt mix through a sieve but just mixing it and that definitely doesn't add the much needed airiness to it. This time I went all aboard and made it the right away and it was devoured by everyone. Here's the recipe:

Dry-fruit Shrikhand


Ingredients:
2 cups greek yogurt (I used fat-free, any is fine, more fat means more creaminess. ;) )
1 cup sugar
1/4 cup chopped dried fruit (pistachios, almonds, golden raisins)
1/2 tsp grated nutmeg
1/2 tsp green cardamon powder
4-5 strands saffron
1/4 cup milk (if needed)

  • Warm the saffron in a 1 tbsp of milk so that it gives out its color.
  • I prefer to use greek yogurt over the normal one, because it has less water content and gives a better creamy texture to the final product. We still do need to strain the excess water from it, I usually leave my yogurt tightly knotted in a muslin cloth hanging over a container to collect the excess water. Leave it straining for about 12-16 hrs. Refrigerate the yogurt until you are ready to make the Shrikhand.
  • Use a seive (one with 1/2 cm or little small sized holes, not the fine mesh) and start mixing the yogurt and the sugar in batches. A 2:1 (yogurt:sugar) proportion fits really well for us, but if you like things very sweet you can add in more sugar. Pass all the yogurt and sugar through the seive and you should have small noodles of yogurt collected in your container.
  • Add the nutmeg and cardamon powder and mix well. Add in the saffron with the milk and gently mix in the strands. I love having strands of saffron through the Shrikhand, they keep giving away more and more color just as if its a fading watercolor, looks lovely!
  • Taste and if the shrikhand seems dry on the palate, add in little bit of milk and mix well. 
  • You can mix in the nuts or as I did this time transfer the shrikhand to a container and garnish generously with the nuts. When you scoop out servings, the nuts will automatically mix in. Gives a nice look to the Shrikhand. Chill for 1 - 2 hrs and serve with roti, poori or have it just by itself!
Diwali isn't exactly over for us. I am performing in the local Maharashtra Mandal's celebration tomorrow here in San Diego. Yet another day of celebrating Diwali. ;)

Hope all of you are having a wonderful time with the holidays approaching us at a warp speed. Until next time..


Tuesday, October 29, 2013

Pumpkin Raita

Hello everyone! Today's post is going to be a short one with the recipe I intend to share before the month of October passes by and to remind myself and everyone that my online entity, my blog will fight to survive! :)
Time is passing by really quickly, I still feel summer ended just now and it ended in a high with us visiting the Yellowstone National Park. But we are already at the end of October!! None-the-less October marks the beginning of festivities and this month has been filled withe exciting things!
The Indian festival Navratri passed us at the beginning of this month and I got to spend it with my aunt and her family. I was truly pampered and ate yummy food all homemade for a whole week! :) With Dassera getting over the hype for Halloween was in the air and of course I had to pick up some pumpkin for myself! I haven't as yet ventured into pumpkin carving but I do certainly buy fresh pumpkin.
Everyone knows about pies, breads and various other desserts using pumpkin, but Indians eat pumpkin mostly in a savory way. I being a picky eater preferred eating it in only one way and that's the quick recipe I wanted to post today!

Pumpkin Raita (Bhopalyacha Bhareet)
1 cup cooked and mashed pumpkin
1 cup yogurt
1-2 green chilies 
3-4 curry leaves
1 tsp mustard seeds
1/2 tsp turmeric powder
pinch of asafoetida (hing) 
1 tsp oil for tempering
salt to taste


  • Peel and chop the pumpkin into cubes (inch size) or bigger if u don't want to mash it completely.
  • Steam the pumpkin till it softens and is easy to mash. (usually 2 whistles for a pressure cooker)
  • Mash the pumpkin and add in the yogurt and mix well. I like my pumpkin to be all smashed but I know my mom prefers to see pieces in her raita, so that it doesn't look like baby food. :P
  • Add in the chillies and salt to taste. 
  • Make the tempering by heating oil and adding in the mustard seeds, curry leaves, turmeric powder and asafoetida. Wait till the seeds splutter and add the tempering in the pumpkin mixture. Mix well and the raita is ready to eat! I usually served it with chapati, but goes well as a side with rice and dal too!

Hope you guys enjoy this recipe! Lots of exciting things in process and coming up and I am determined to share it with everyone and post more often! :)

Thursday, July 4, 2013

Taro at its best!

I have been in a phase where I am cooking a lot and yet never get the right set of pictures to post about it! It is laziness at its best and yes I am guilty as charged! But today has become an exception! It is the taro recipe that compelled me to post about it! This stir fry recipe is a quick-fix dinner option that I make almost every 15 - 20 days. Yet to this date I haven't posted about it. I was compelled to do so because a cute old lady asked me what it was in the local Indian store when I picking up a batch for my weekly meals. She humbly asked me, "Is this used to make a sabji?" and I was truly surprised to know something so common for me was still unknown to many!

I was introduced to taro as a root vegetable right since I was a kid. The earliest memories are of me plucking taro leaves for my aunt from her frontyard to make a delicious stew out of it. Back in India, vegetarians end up consuming a lot of root veggies to make up for the much needed meatiness in the meal. Taro is literally just that. I like to think of it as a meat for the vegetarians! ;)

Sorry I forgot to get a picture of how it looks originally, but the web is filled with them! The wiki page surely has some good info on it.

This stir-fry is simple and is ready in no time! It is dry and hence goes really well as a side with just simple dal-rice or some hot phulkas! I love it so much that I can have a bowlful of it and in fact I have ideas for making it as an appetizer, all that meatiness would surely go well with a nice cold margarita or a beer!

Arvi chi bhaji (Taro Stir-fry)
Ingredients:
6-8 med. sized taro root (2-3 inches long)
1 tsp Ajwain seeds
1 tsp Turmeric power
0.5 tsp Asafoetida powder
1.5 tsp Red chili powder
2 tsp Coriander-cumin powder
1.5 tsp Amchur (dry mango powder)
1 tsp Mustard seeds for tempering
2-3 Curry leaves
2 -3 tbsp Oil to stir-fry
Juice of 1/2 Lime
Salt to taste
Chopped coriander to garnish
Boiled taro root

  • Boil the taro just like you would boil a potato. I usually do this in a pressure cooker and let it steam for about 4 whistles. Once boiled and cooled, peel the taro skin and chopped it into 1 inch pieces. 
  • Use a non-stick pan to be able to handle the stickiness of the taro with minimal trouble. Add oil to the pan and once heated add the mustard seeds and the curry leaves. Once the seeds crackle,  add the turmeric powder and asafoetida. Once these are cooked in the oil, add in the rest of the spices. We add all the spices into the tempering so that it coats the taro uniformly.
  • Once all the spices are cooked add the taro pieces and let it saute well on med-high heat. Once the edges of the taro start to brown season with salt and add the lime juice. Garnish with coriander and serve with some hot phulkas!
It is a root that you would feel a little awkward to pick up considering its muddy hairy look along with the sticky texture it gets once steamed. But my humble request to all of you will be please look beyond that! It's a delicious root and really quick to work with especially in these hot summer months!
Until next time..


Wednesday, May 15, 2013

Bake Sale Recap

It has been a really busy month! Its already a week since the bake sale was over and finally its today that I get to post about it. This was my second time at the bake sale and I had a much better idea of what I need to do and what to expect. With the given time constraints I decided to make simpler items this time but took a risk of making two of them.

Continuing with the last years theme of French desserts I decided to make Palmiers this time. The idea struck when I saw a steady stream of people buying them at the local grocery store. When I looked up the recipe, I was astonished to find how simple it is to make them! I used this recipe which I felt gave the simplest illustration for the steps to make them.


Here are my tweaks to the recipe:
  • I only used a total of 1/4 cup of sugar for the whole pastry sheet. 
  • I bought the Pepperfridge farm's pastry sheets. Since they are packed in a 3-fold, I split the sheets on the same folds which in turn made it easier to cut them into pieces. 
  • I used milk instead of egg wash to seal the palmiers. 
I made the palmiers in two flavors - cinnamon-sugar & passion-fruit jam filled. I initially planned on making sweet and savory kind, but the savory ones tasted better when served warm. The only thing I missed through the whole prep was I forgot to click pictures of palmiers in prep. :(

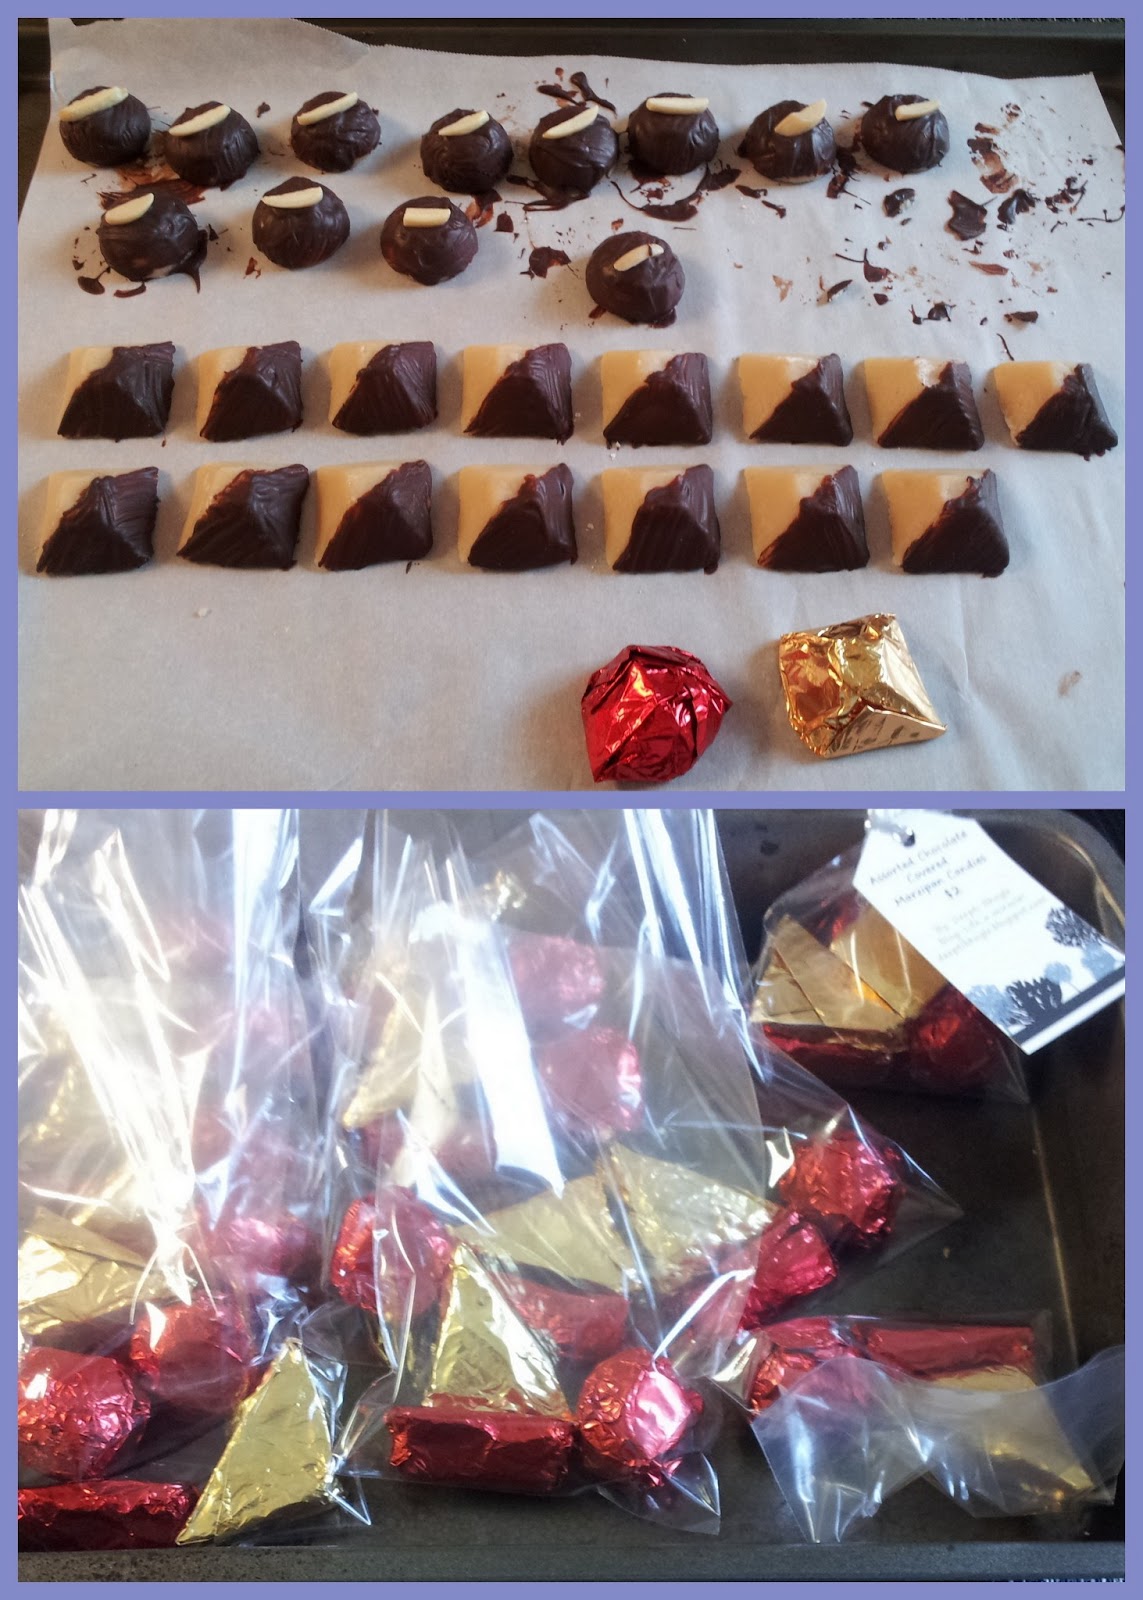
I also made chocolate coated marzipan candies for the sale. I originally made Marzipan candies for Valentines day for my husband and never got around to posting about them. I love marzipan! Making it at home is quite simple and the homemade one tastes really good! I coated them with semi-sweet chocolate and added dried fruits on some to make it an assorted set. 

I used the cooked marzipan recipe available here and tempered the chocolate using these instructions. 


And finally below are some clicks from the bake sale! Loved the cupcakes towers and all the cute cookies! So much fun!


Monday, April 29, 2013

A fresh new look for the season

Its been almost two months since my last post, but the meal planning has been consistent. I have now set myself into an almost regular schedule that includes workouts, dance classes and reading books! Of course that leaves me with very little time for blogging and hence that is something I need to get aligned with my schedule. Today's post is really a catch up with my readers to let you guys know what I have been up to. :)

With the onset of spring, I have managed to get the pantry re-organized, made a quick coupon organizer and finally got back to learning Bharatnatyam. Last weekend was finally devoted to my blog and the result is surely visible. The blog now offers a neater look and hopefully makes it easier to read. There are still a good list of things I want to do on the blog, but for now this is a good start.

With parents visiting us, life has become a true roller-coaster! My kitchen has been yanked into full swing with lots of authentic and experimental dishes I want my parents to try. Today's recipe is about a very Maharashtrian dish specially made on a day of fasting. Its yet another creation by someone who decided to mix up dishes with different textures to make a delicious combination. There are various versions of this recipe available online, the closest one that I liked is on the Chakali blog available here. What none of the blogs really had was some good clicks, explaining the creation of the mix. So here you go:


That's all for today's post, of course this week is surely going to turn into one of busiest for this season especially with the bake sale coming up next week. An update on that will be coming up shortly! So for now have a good night everyone.


Saturday, March 9, 2013

Weekly meal planning

Its been a good year so far.. with a new job and an on-going inspiration to loose weight albeit not a new year resolution! My life has been surrounded with lots of new interesting work challenges and equally challenging planning of meals. I say challenging because if I want to get done with a hour-long work-out in the evening, I am left with only 45 mins to get our dinner ready. Don't ask me why and how only 45 mins..lets just say we prefer to finish dinner before 8.30.. 9.00 pm tops!

With that in mind, deciding what to make for at least 4 nights in the week does get to be a task! Much till the mid feb, I would decide the dinner of the day based off my mood aka whatever came to my mind then. Now you can understand that such a schedule would definitely not work out to be best! I would end up with recipes that took much longer than 45 mins or too much left overs.

But after reading this post by Nupur at One Hot Stove, I was totally inspired. What came to mind was instead of writing down each day what we had for dinner, I much rather create a small meal plan for the week! That way I would not only have time to think about dinner in advance (over the weekend) but it would also make sure I have minimal wastage of produce!

I usually do get overly excited about such ideas and so this time I decided to take it slow. For the first week, I decided only on a couple of recipes and checked how the plan rolled out. Fortunately I made it through the week with success and last weekend I finally made a concrete dinner plan for the coming weekdays, 4 days of eating-in!

Below is what we had for the past week:

Mon 3/4 - Rava(Semolina) Idli with Coconut chutney
Tues 3/5 - Sweet potato curry with Vari tandul (Jungle rice) and cucumber raita
Wed 3/6 - Ordered Pizza ( originally planned for Noodles with tofu and bell-pepper)
Thurs 3/7 - Masoor Pulao with Tomato-Cucumber raita
Fri 3/8 - Left-over pulao with snacks

So to compensate for the earlier planned noodles, I made the noodles for lunch today with a side of steamed edamame! Yumm! :)

It wont be a surprise to you guys if I say that reading through food blogs is truly therapeutic for me and I do that for at least 10% of my each day. With that I end up having a plethora of recipes and definitely love to find those which are quick, healthy and delicious! So the upcoming week's meal plan does have such inspirations sprinkled through it! :)
In the hope of still managing through this plan, I am posting my meal plan in advance and will surely report back what happens through the week. So here is the plan:

Mon 3/11 - Moong curry with chapatis and tomato raita
Tues 3/12 - Besan pithla with chapatis and Snehal's peanut chutney.
Wed 3/13 - Fusili with pesto and veggies
Thurs 3/14 - Puliogare rice with black grams and side salad
Fri 3/15 - Eat out!

I am totally stoked by the whole idea and just hope this works well for the upcoming months! Planning this definitely makes my life easy through the week and helps me waste less and in fact save some money! I am sure if executed even more strictly one can easily have a lean weekly budget set for meals! I would surely be interested in hearing what you guys think about this and if you have an such ideas up your sleeve!

Have a good weekend everyone!

Wednesday, January 16, 2013

Cherished memories

Everyone I am sure has a particular restaurant or a food truck or even a good old stall around the corner of the road that they cherish in their minds for some of the best food they ever had. I have a few in my mind that I cherish oh so dearly and every India trip I make sure I go through that list even if I am suffering from an upset stomach. :P

This past weekend, I was missing the steaming hot idlis and the crispy buttery dosas from a restaurant in Mumbai that goes by the name Sadguru. Every person who has spend time in the suburban area of Chembur knows this restaurant and oh boy did they have huge waiting lines! What I loved about the south Indian food offerings in this restaurant was the fact that they served us three different kinds of chutneys to go with the main dish. I loved each of the chutneys because they weren't the watery kind and had a distinct flavor which made each of them stand out! Infact it was this assortment I was missing more than the actual dosas/ idlis. 

So of course, I got over the craving by making two differents chutneys to go with some instant mix dosas.. I know I know..I hear it..instant..really??? I was just too desperate to enjoy the sides and made way with the instant mix.. ;) One of these chutneys was something I made for the first time, I had the old flavor of the chutney lingering on my tongue and with a little bit of research online, I devised the recipe for this chutney with the help of this recipe. 

Tomato chutney


Ingredients:
2 medium tomatoes roasted and diced
1/2 onion chopped
2-3 cloves garlic 
1.5 tbsp sesame seeds 
3-4 dried red chilies
1 green chili chopped
2 Tsp urad dal
2 Tsp chana dal
1 tsp cumin seeds
1 small piece of tamarind softened or 1 Tsp of Tamarind Paste
Salt to taste
1 tsp  + 1 tsp oil

For tempering:
1 tsp oil
1 tsp mustard seeds
3-4 curry leaves
  • Heat a pan and dry roast the sesame seeds just until you can smell the aroma. Set aside to cool.
  • Heat 1 tsp of oil and add the urad dal, chana dal, cumin seeds and the dry red chillies until the dals turn in to a light brown color. Set aside and sprinkle some water onto this mixture to help soften the dals.
  • To the left over oil, add the green chili and the chopped onions. Once the onions are getting transparent, add the fire / oven roasted tomatoes and the tamarind pulp . Allow for it to saute well and until all the water evaporates. Allow to cool.
  • Grind the dal mixture along with the sesame seeds followed by the tomato mixture. Adjust the salt to you taste. 
  • Transfer the chutney to a bowl and season with the tempering. Enjoy with your choice of idli / dosas.
The tangy flavor of the chutney was truly delicious and even with the effort involved it was truly worth it! 

Sunday, January 6, 2013

Green fiesta

First and foremost, I wish everyone a very happy new year! May this year be filled with wonderful moments of joy and cheer! I have had a very fulfilling past year, it was the year I got married, it was the year where we overcame some big obstacles and it was the year we as newly-weds thoroughly enjoyed spending time with friends and of course with each other. ;)

The past year made me realize what marriage really is, its when you realize, 'you' means 'we' and that 'we' becomes the biggest support system you ever had. I am truly thankful for having a life partner, who not only sees the best in me but knows how to push me towards what I can achieve which I surely dont think I can. So with these lovely memories from 2012 of course with its fair share of sorrows, I have stepped into 2013 with great hopes and lots more ambition!

Talking of ambition, I am no different than any other person, who thinks this is the year I will loose a ton of weight! At least I hope so.. :P. So workouts have begun of course, but I am also researching on an easily adaptable healthy diet.. I know diets are never easy, but that's where the nerd in me is challenged to find out why not. :P Since the past year, we have adapted ourselves to eat healthy and of course cook healthy. And so today's recipe is one of those OMG kinds' I havent had in a while now!

Yesterday I went to bed with a question in mind, as to what do I do with one ripe avocado left in my kitchen! I started thinking of pairing it with something, of course spinach was something I had to use up and I put myself to bed asking, will they work together?

Today morning, the first google with my coffee was 'spinach and avocado recipes' and voila I wasn't the first one who tried that. The recipe below had to be tried and it was a true success!  I did not use any cheese or any cream in this recipe since the avocado gives it the needed creaminess.


Pasta with spinach and avocado sauce

Ingredients:
2 cups Baby spinach
3 - 4 cups fusili or any kind of pasta you prefer
1 Avocado - pitted and cubed
4 cloves garlic
1/2 onion sliced thinly
1/2 capsicum chopped vertically
1 zucchini sliced
1/2 tbsp italian seasoning / dried herbs of your choice
1/2 tbsp ground black pepper
1/2 tbsp red pepper flakes
1.5 tbsp olive oil
Salt to taste
  • Blend the spinach and the avocado with one clove of garlic and a green chili if you like. Add water if needed. 
  • Cook the pasta as per the instructions on the box till al dente. In a sauce pan, heat some oil and add one glove of garlic. Remove the garlic once you smell it. Add the onions and let them cook until they become transparent. Add the capsicum and the zucchini and cook them well. 
  • Add the sauce and let it simmer for a few minutes, followed by the herbs. Mix in the pasta and season with salt and pepper as needed. Garnish with some parmesan cheese and red chili flakes. We enjoyed it with some home-made garlic bread! Yum!
This pasta turned out totally green because all I had in my fridge was green - spinach, avocado, green capsicum and zucchini. :P This combination has sparked several ideas in my mind and hopefully they will be inspiring me more to continue blogging. 

Saturday, July 21, 2012

Something old..something new..

This post has been long due! I was actually suppose to post this one last september but today is the day that I finally got around to posting it. The topic of this post is truly apt! This post started off to showcase my growing love for Mexican food. An idea struck and I wanted to show you why I first started loving Mexican food and how far I have got on experimenting with it!

Back in school, one of our usual lunch options was chickpea burrito from a Mexican food cart. It used to be yummy! And I was truly thrilled to find chickpeas in a burrito!
Since coming to San Diego, I cant seem to get enough of Mexican food. Here in SoCal, its the best cuisine you could find and offers you regional variations in the food. It is here that I learned that eggs are frequently used in Mexican cuisine too and they taste amazing! So last year when I actually started making Mexican dishes at home, experimenting with eggs was a no-brainer.
So today I present you two recipes..

Something old..


Chole burrito (Chick-pea burrito)


Ingredients:
2 cups boiled chickpeas
2 tbsp tomato paste / 1 tomato chopped
1 chopped onion
2 cloves garlic minced
1 tbsp coriander-cumin powder
1.5 tsp red chili powder
salt to taste
1.5 tbsp oil
1/4 cup shredded cheese (I used the mexican mix)
1/4 cup thinly sliced onions
1/4 cup rice (optional)
8 mini tortillas / 4 standard ones


  • Add some oil to a pan and let it heat. Once heated add the garlic and let it brown a bit. Drop in the onions and saute them well.
  • Add the red chili and the coriander-cumin powder and let the spices get cooked.
  • Add in the tomatoes and let the whole thing saute well.
  • Finally add the chickpeas and season well. Let the spices seep into the chickpeas and let it simmer for about 5 mins. The chickpea mixture is now ready.
  • Now to assemble the burrito. Heat the tortilla on one side and flip it. Now place some cheese at the center and add the chickpea mixture. Top it with some onions and rice and wrap the tortilla, you can seal it by placing some cheese between the fold and turn over the burrito. Let it heat for a min on the other side. 
I usually serve my burritos with fresh guacamole sitting on a lettuce bed and some spicy salsa!  :)
Now for,
Something new.. 
I have actually made several variations of this recipe and it all started with this specific one posted by Kevin from Closet Cooking. 

Asparagus & egg enchilada


I really dont have a specific recipe for this. Since eggs are so versatile, I usually mix them up with a variety of veggies or sometimes just use the basic scrambled eggs recipe. Give it your own spin and you will surely not be disappointed! Another easy thing to use the Indian style egg bhurji which is basically scrambled eggs seasoned with curry masala. 

The same base can easily become a burrito / enchilada. For the enchilada sauce, I usually also keep switching the flavors of my sauce too. I know the pictures aren't the most perfect ones..but it was delish!
 As you see my love for Mexican food is growing and I hope to learn more authentic recipes and someday I hope I get a chance to go to Mexico and try out the real stuff! :)

Monday, July 2, 2012

Summer time rush..

Summer time is supposed to be all about relaxing and chilling out in the sun..but come this summer and I have been rushing through the door day in day out! It has been crazy busy but it has been all great.. :) June began with a work trip to St.Louis and I was physced! The trip went really well and I did get some time to drive through downtown St.Louis and get a glance of the lovely arch! The arch was absolutely beautiful and it was a lovely sunny day to be at. 


On one of the weekdays I drove through a mall nearby and found something really uncommon in one of the artsy stores. They had live crabs for sale called Hermit Crabs!


The shells on the crabs were painted with cute patterns and at first glance one would have really no clue that there was a crab in it! I was almost tempted to touch one of them..

The rest of the June past by with more work and really didn't leave me anytime to bake. This has been the first month in a long time that I did not bake! Hopefully I will make up for it this month. :) I did cook a lot and in fact I can now proudly say that I make really soft fluffy rotis! :) That was one more thing I had to master sooner or later and practice for the past month has made it possible. 

With summer I am reminded about India. This would be the season when one would get the best of the tropical fruits! The markets would be loaded with mangoes, cherries, jackfruits and lychees! It was years since I had a yummy lychee and the other day at the Indian grocery market I spotted them! I literally ran to grab a bunch and the moment I was home I was enjoying the fresh flavor! Along with these lovely fruits the one thing that I miss about India is the 'Naturals' ice-cream. Its a local chain that sells fresh fruit ice-cream which ranges everything from coconut, chikoo to lychee ice-cream! I got so nostalgic that I just had to make it and ofcourse of a healthier kind! The ice-cream came out to be really rich and bursting with flavor. I experimented with the recipe using the basic vanilla ice-cream recipe as my base. Another great way to use lychee / lychee juice is in cocktails! I cant wait to buy my next batch and experiment with it..ummm! :)

Lychee by itself is really yummy and I can finish a dozen in a matter of minutes..really seconds.. :P But the best part about it is the health benefits that lychee has, read on here for more! Though to truthfully say it I love lychee for its flavor and really had no clue about how healthy it really is until recently. 


Lychee Honey Ice-cream

Ingredients:
1 cup chopped lychees or use the canned one with the juice from the can
1.5 cups 2% milk
1 cup heavy whipping cream
5 tbsp honey
4 tbsp sugar
1 tsp vanilla extract
Zest from 1/2 lime 
  • In a large bowl, mix the milk,cream,honey and sugar. Once mixed well, add the vanilla extract followed by the lychees and the juice. Let the mixture refrigerate for 1-2 hrs.
  • Take the mixture out and mix the zest in and pour the mixture into your ice-cream maker. Follow the instructions on your ice-cream maker and let the ice-cream churn. Transfer to a freezer-proof box and let it refrigerate for 2-3 hours at a minimum. Enjoy!


Work has taken most of my time away in the past month and I am really trying to keep myself on track with my usual schedule..so here's hoping to getting back to more blogging and enjoying the summer with all my readers! Have a great 4th of July everyone! :)

Monday, May 28, 2012

Raspberry semolina muffins..so spring!

I cant believe it has been a month since the bake sale and here I am. The past month has gone by at warp speed! We had my parents visiting us for about 2 weeks which included several family dinners and my brother's graduation! woo-hoo!! Kudos to him for graduating from USC! :)

My baking has been fairly less mainly because we have been eating out way too much..time to dial down the crazy, but I just couldn't miss out on participating in the monthly #baketogether challenge. 
It was the perfect timing since my parents got to experience my baking and this month's recipe for Cornmeal Buttermilk Muffins is pretty much the recipe I use every time I want to make healthy muffins. But instead of using cornmeal I tend to use semolina which gives the same kind of texture but is made from rice/wheat.


Here are the modifications I made to the basic recipe:
1 cup chopped raspberries
3/4 cup all purpose flour
1/3 cup wheat semolina
3 tbsp sugar
2 tbsp honey
2 tsp baking powder
1/4 tsp table salt
1 tsp lemon zest
1/2 cup yogurt, at room temperature
1 large egg, at room temperature
3 tbsp canola or vegetable oil
1/2 tsp pure vanilla extract

Follow the same directions as mentioned in the original recipe. I only got a couple of snaps of these muffins, with family around these were gone by the next evening. I did pack a couple and gave it to my parents for their trip and felt super glad that I could share my baking joy with them.

Oh and another thing that I am super excited about is my first set of plants! I have planted tomato, chili, basil and cilantro. So far the tomato bears lots of flowers and I hope to get some fruit soon but my chili has given me a good amount of hope, I got my first big chili! Look..


..until next time..have fun!

Wednesday, May 9, 2012

Bake Sale Recap & macaron musings..

I am no expert when it comes to baking, none-the-less macaron making, oh it rhymes.. :P But it has been a really great learning experience for me, not only for learning the right way of whipping up a meringue but rather learning to respect each ingredient. This post is going to be a way for me to document my lessons for macarons and also to help out other bakers who have given up on macaron making. I urge everyone to not give up this magical cookie, just try and stretch your patience and reduce the level of your expectations when you get started with this. But before I go on with my macaron trail, I want to share some photos and some posts from fellow bloggers who participated in the sale.

I of course made macarons in two flavors: Lemon macaron with mango butter & Raspberry macaron with dark chocolate ganache. umm..ummm! I went through a turmoil in terms of deciding what I should pack them in. I didn't wanna spend crazy $$ on just boxes but putting them in a small treat bag  felt like laziness and made me super scared that they would be crushed by someone. So inspired by a post by Bakerella right here, I decided to make my very own box template and the end product came out to be something so cute! :) 


As usual, keeping the boxes for the last minute only made my time management crash down, but with help from the lovely hubby I finally managed to get my stuff to the bake sale! It was an amazing experience! Its a great thrill to see people's reaction right then and there and understand how people look at food. I got some really good reviews for the macarons, and was elated when I got some mentions in blog posts too. :)

I also got to meet some really great people, who share the same passion of food as me. In the hurry to get to the sale, I forgot my camera, and so now I can only provide you with some links to posts from other bloggers. While selling macs, I also went around and bought some goodies! I bought the Orange Chocolate Tart from Ann, the cinnamon and cardamom cookies from Live..Bake..Love and the cotton candy meringues.

So here are some of the blog-posts that others posted after the blog:


So now for some tips and tricks for making macarons. I found great amount of help from two blogs, they served as my textbook! So if you are venturing into making macarons surely read these two blogs, here they are:

  • An exhaustive post about macarons by Ms.Humble at Not So Humble Pie
  • A list of great tips for making macarons with do's and dont's by Stella at BraveTart

And finally some tips from this novice baker.:)

  • Measure all the ingredients correctly, buying a scale really made my life easy with this. Also one large egg white when measured equals about 34-36 gms.
  • As Ms.Humble promptly tells, use a steel bowl to beat the meringue in.
  • Since I was baking a lot of batches, I halved the recipe given by Stella (here) so that I could control my portions and the recipe required exactly one egg white! So easy to handle that, imagine taking only half of the egg white! huff..
  • You need to know your oven well, I know this is something you will hear from every other baker, but to start off, raise the lower rack of your oven to a higher level and as Ms.Humble says if they brown from the top, you might need to put an additional sheet on the top.
  • Use a stencil (round cookie cutter) to draw out circles on a parchment, surely makes life easy while piping.
  • I know pretty much everyone says aged whites create a more stable meringue, but I actually got really good results with fresh egg whites so I guess if you beat the meringue right, this issue gets taken care of.
  • I took advice from both the mentioned blogs almost equally and that really helped, so do your home work before you begin the practical. 


Hope this post helps you in your ventures and do let me know if you have doubts about macarons, I am pretty sure I have experienced it by now.
Happy Baking! :)

Saturday, April 21, 2012

Macaron frenzy ends..having cheerios to celebrate.. ;)

I have been busy..crazy busy..with work and with crazy unplanned macaron adventures! Finally after about 6 batches of macarons I can claim that I can make good macarons!! Yippee! :) I set out at the beginning of this month on a macaron learning process, the french ones ..oh yeah! And 15 days later here I am feeling so much confident about it. Here is a sneak preview of it:


I am making them for the upcoming San Diego Bake Sale on April 28th.

So after I reached a point where I felt confident of that the fact that I wont be messing up things at the last minute before the sale, I realized that I really wasn't baking anything else! OMG! So when I found my mind macaron free I baked my heart out.. :D.. first up was a savory dish baked bakarwadi..sadly I cant find which memory chip I put the pictures on, I will find them and post them later on.

But yesterday after going through a periodic pantry clear up process I found that I had few over-ripened bananas and a box full of cheerios cereal! I keep this cereal in my pantry as a backup cereal..yes I am a freak..but it helps to have a couple of choices for cereal. :) So when I realised that this box was moving towards getting too old I had to find alternate options to use it and this experiment just found the right place for it! :) When I googled for cheerios recipes I actually found a lot of recipes on their own website..they looked pretty good and inspired from them I decided to experiment.

We have banana-nut loaf/muffin all too often to feel the need to experiment with it..but I still decided to go ahead and give it another stroke of newness..so here it is..the muffins came out really good..light yet satisfying!


Cheerios banana nut muffins

Ingredients:

    1 1/4 cups Honey Nut Cheerios cereal
  • 1/2 cup all-purpose flour
  • 1/2 cup whole wheat flour
    2 tbsp packed brown sugar
    1/2 teaspoon baking soda
    1/4 teaspoon salt
  • 1 ripe banana
    1/2 cup yogurt
    2 tbsp canola oil
    1/2 teaspoon vanilla
    1 egg white
    1/4 cup chopped walnuts
    1 tsp coarse or granulated sugar 
  • Heat oven to 400°F. Spray bottoms only of 8 regular-size muffin cups with cooking spray, or line with paper baking cups. Spray bottoms only of paper baking cups with cooking spray. In large resealable food-storage plastic bag, coarsely crush cereal with rolling pin or meat mallet.
  • In a bowl, mash the bananas and mix in the yogurt.
  • In another bowl, mix crushed cereal, flour, brown sugar, baking soda and salt. In a mixing bowl, beat oil, vanilla and the egg white until blended. Add the yogurt mixture and mix well. Now add the flour mixture followed by the walnuts. Spoon batter into muffin cups. Sprinkle with coarse sugar.
  • Bake 15 to 18 minutes or until light golden brown. Remove from pan to cooling rack. Serve warm or cool.

Wednesday, April 4, 2012

Snap n its spring!

The spring has officially started and its going to be more exciting than ever!
I have been missing for the past month or so..but no I did not forget my blog and neither was I on a break from baking. If anything else I am baking way more than usual but its mainly experimentation. I was postponing to post anything because all my baked goods are currently meant to be for the upcoming Bake Sale in San Diego. Today's recipe is a contender for the bake sale, just that it has gone one rank down in my list. :P


I have had this recipe bookmarked for almost 6 months now. Initially I didn't pursue it because it had ingredients which I usually don't find in my pantry but with my hubby's love for gingersnaps I finally got to this recipe. Its actually a recipe tried and tested by the very famous David Lebovitz. You can find the original recipe here. After I saw the recipe for the first time I was really curious! Fat-free gingersnaps, is that even possible? And to my finding yes it is!

I used the recipe as is, just switched half of the flour with whole wheat flour and used light brown sugar since I had it in my pantry. I did make the candied ginger at home and it was way easier than I thought it would be. I used the recipe suggested by David Lebovitz again and you can find it here.


Now for the fun news. When I moved to San Diego last year, I heard about the bake sale from my friend, but I wasn't really setup to do anything..much rather bake! So it was something I was looking forward to this year. And finally it is this very month that San Diego will have its blogger's bake sale! If you are in the San Diego area then do drop by and enjoy the goodies and have some fun! You could also donate to the charity and join in! More details available here: http://sdbloggersbake.wordpress.com/. Hope to see you all there!

Friday, March 9, 2012

Time to celebrate!

I am feeling so good about writing this post. Its my 25th post! yay! The first recipe is quiet special, especially because I learnt this one from my mother-in-law! I spent most of January with my in-laws and I got to enjoy a new cuisine which wasn't very different than the food I grew up eating but it was more rather an adaptation of a cuisine to locally available ingredients. To top that my mother-in-law is an excellent cook who also enjoys experimenting with recipes so I have been lucky to have her around me! :) I am in food heaven! :D

My in-laws come from the central region of India which is majorly dry and mostly warm. The cuisine is quite rich and bursting with spices. I can't begin to list and describe all the different dishes I tried out, I could go on for days! So after a few weeks of being back in the US, I of course started to reminisce about all the yummy things I had and to end that craving I was set on recreating some of them.

The first one that came to my mind was the Baingan Bharta (Eggplant curry). It was one friday night when I realized that I had all the required ingredients to make it and decided that my weekend would start with a delicious dinner! I have made this dish quite frequently but not in this way! So here goes:

Baingan Bharta (Eggplant curry)

Ingredients:
1 Large eggplant ( the big sized ones usually used in Italian dishes too)
2-3 medium spring onions chopped
2-3 green chillies split vertically
2-3 cloves garlic chopped
curry leaves
1 tsp mustard seeds
1 tbsp vegetable / canola / EVOO oil
1/2 tsp asafoetida (optional)
1.5 tsp coriander-cumin powder
1 tbsp lime juice
salt to taste
cilantro for garnish

  • Roast the eggplant in the oven or on the gas flame. Its done when the skin starts peeling off. Once roasted, peel the skin off the eggplant, separate off the flesh from the head of the eggplant and mash it well.
  • Heat some oil in a pan. Add in the mustard seeds and curry leaves. Once the mustard seeds splutter, add in the asafoetida followed by the chillies and garlic. Once the chillies are almost fried, add the spring onions and let them cook well. 
  • When the onions become transparent, add in the eggplant and mix well. Add in the lime juice, coriander-cumin powder and adjust the salt to your taste. Let the whole mixture come together, it becomes like a slushy mass. Season with cilantro. Enjoy with hot chapatis!
We had it with some home-made garlic chutney, sliced raddishes and chapatis! yumm!


Now to celebrate my 25th post and the International Women's day, here is the recipe of the roasted plum and peach ice-cream I tried out, inspired from this recipe posted by Deeba on her lovely blog! I of course tried to give it a healthy twist.

Roasted plum and peach ice-cream (low-fat) (eggless)

Ingredients:
4  plums
2 peaches
1.5 tbsp brown sugar
1 tsp vanilla extract
1/4 cup roasted almonds coarsely chopped
250 gms low-fat greek yogurt
200 ml half-n-half
4 tbsp sugar
6-8 tbsp honey - adjust the honey based on the sweetness that you like

  • Preheat the oven to 375 F.
  • Combine sugar and vanilla. Arrange the peaches & plums skin side down on a baking tray and sprinkle with the vanilla/ sugar mixture. Grill in the oven for 20 minutes or until the top of the peaches appear caramelized.
  • Remove the skin from the peaches as soon as it is cool enough to do so. Puree the peaches and any juices in the baking tray in a blender.
  • In a separate bowl combine the half-n-half, greek yogurt and peach/plum puree. Adjust sugar as required. Churn in your ice cream maker according to the manufacturer’s directions. About 5 minutes before switching off the machine, add in the chopped nuts. Refrigerate for about 2 hours and serve! 

Hope all you lovely ladies out there had a great Women's day! Also here is to hoping that I get to write many more blogs!

Saturday, February 25, 2012

Say cheese!!

Alrite, I am late for this post. I was truly missing the treats I would enjoy back in New York and Abby's recent #baketogether challenge gave me the perfect opportunity. New York cheesecake has been one of my favorite desserts for quiet sometime now! I know many might think cheesecake really? but yes I love it! And look how pretty!! :)

Mini cheesecakes


I usually try to experiment with this challenge but this time I wanted to preserve the essence of a New York cheesecake and hence kept the recipe pretty much same. But one thing is for sure, instead of making a whole cake, I prefer making them in petite form just so that I can control the portion size better and further on reduce the guilt. The two missing in the photo below is just because they were consumed before realizing that no pictures had been clicked.. :P


The only thing I changed was the crust. I didn't have any graham crackers at home and used what I found in my pantry, in this case it was a mix of marie and Nice (a spiced sweet biscuit - Indian) biscuits. The crust tasted really good, and the amount of spice gave a nice contrast to the filling.

I won't be posting the recipe for this since it is the same as suggested by Abby in her post. As for the crust below are the ingredients (I cut down the original recipe to half):

Ingredients:
1 cup marie and/or Nice biscuits ( I used about 10-12 biscuits)
1 tablespoons granulated sugar
2 tablespoons unsalted butter, melted

Friday, February 17, 2012

Unplanned success!

I had no plans of baking on weeknight especially after having a busy and tiring work day. But in the spare 10 mins of my lunch hour I was trying to find a recipe to use up the all-so-ripe pears sitting in my kitchen. Well, instead of that, something else caught eye..this lovely Raspberry Buttermilk Cake on one of my favorite blogs: Smitten Kitchen! :)


After reading this recipe, I just couldn't let it go! I had fresh raspberries from the farmer's market sitting in my kitchen just waiting to be baked. :) So the moment I got home I was ready to whip it up, of course with a healthy twist. I replaced a good bunch of things but kept the essence of it intact. The cake turned out beautiful and light! I cut down the sugar quiet a bit, but the ripeness of the raspberries made up for it.

Raspberry Yogurt Cake

Ingredients:
1/2 cup all-purpose flour
1/2 cup whole wheat flour
1/2 teaspoon baking powder
1/2 teaspoon baking soda
1/4 teaspoon salt
1/4 cup + 2 tbsp olive oil
1/3 cup plus 1tbsp sugar, divided
3 tbsp honey
1/2 tsp vanilla extract
1/2 tsp finely grated lemon zest (optional)
1 large egg
1/2 cup yogurt
1 cup fresh raspberries
  • Preheat oven to 400°F with rack in middle. Butter and flour a 9-inch round cake pan.
  • Whisk together the flours, baking powder, baking soda, and salt and set aside. In a larger bowl, beat oil and 1/3 cup sugar until pale and fluffy, followed by honey, then beat in vanilla and zest, if using. Add egg and beat well.
  • At low speed, mix in flour mixture in three batches, alternating with yogurt, beginning and ending with flour, and mixing until just combined. Spoon batter into cake pan, smoothing top. Scatter raspberries evenly over top and sprinkle with remaining 1 tbsp sugar.
  • Bake until cake is golden and a wooden pick inserted into center comes out clean, 20 to 25 minutes. Cool in pan 10 minutes, then turn out onto a rack and cool to warm, 10 to 15 minutes more. Invert onto a plate.

Overall a perfect treat for breakfast or an accompaniment a light lunch/dinner.


Saturday, February 11, 2012

Back to the grind

I really couldn't figure out on what note I should begin this post. I have been out of the blogging world for a good 3 months. Its definitely been a long time and truly an unplanned one.
The past year was a real tough one..though it brought on a lot of good changes, it was a challenging year for me and for the new 'us'. But with the hopes that the new year will be a new start for us, we got married on the first day of the year! :) We had a small ceremony with the near and dear ones and truly have some lovely memories of the day..the kind that become stories that would be passed down through generations.


Its been only two weeks that we got back from a long India trip, a true hiatus but now I couldn't be more ready to cook, bake and of course experiment! I must admit to something, for the past 6 months I have been receiving the Martha Stewart Living magazine actually addressed to someone else who lived at the same address previously. :P I am not exactly a big fan of it but then who wouldn't mind a free copy. :D
So after getting back, on a free afternoon and I was finally able to go through all of them and bookmark the interesting recipes. Today's recipe is something I found in the one of these magazines. It is just the right recipe for someone who is actually getting started / getting back to baking and wants to make something simple and quick and with minimal measurements. I was a definite qualifier for that.
So here it is a cookie recipe with a twist in it.

Semolina sheet cookie
The original recipe suggested that the cookie resembled a deconstructed biscotti. The cookie has a lovely crunchy texture and comes out really light.

Ingredients:
1/4 cup all-purpose flour
1/4 cup oat flour
1/4 cup semolina
1 tsp crushed fennel seeds
1/4 cup sugar
1/4 tsp baking powder
a pinch of salt
11/2 tbsp butter
1 large egg / 2 egg whites - save some for brushing
1 tbsp sliced almonds


  • Preheat oven to 350 F. Whisk together the flours, semolina, fennel seeds, baking powder and salt.
  • Beat butter and sugar together until pale and fluffy followed by the eggs. Add in the flour mixtures and bring it all together. 
  • Press dough into an even 1/4-inch thickness on a parchment lined baking sheet. Brush with egg wash and sprinkle with almonds. Bake until golden, 22 - 25 minutes. Let cool on a wire rack. Break into pieces and enjoy!
The semolina adds the crunch to the cookie, but the fennel seeds show up in between and deliver a lovely flavor. I was surprised by the flavor of the seeds, truly didn't expect them to do so well in a cookie! Hope you guys enjoy it too.


Sunday, November 13, 2011

Steaming goodness..rava idli!

Yikes, I really got late on this one! We all know and love South-Indian cuisine. The light fluffy idlis, crispy dosas and the spicy & tangy sambar..umm just makes your taste buds crave. I of course crave these delicacies once in a while and then try to recreate them in my small homely kitchen. A fortnight back, I was trying to recreate the ever-so known and loved rava idli. I researched around to find out what others have done to create light rava idlis as I was not very keen on using baking soda. So finally after reading up on a few of the recipes I created this one..they turned out really good! When I made these I didn't have all the usual ingredients for a green coconut chutney, so I made one with red chillies and it was surely yummy!


Rava idli with red chili coconut chutney

For the idli:
Ingredients:
1.5 cups rava
3/4 - 1 cup yogurt
3/4 cup grated carrots
8-10 cashews broken
2 tbsp chana dal
6-8 curry leaves light crushed
1.5 tsp mustard seeds
1-2 red chillies cut into small pieces
salt to taste
1 tbsp oil

For the chutney:
3/4 cup freshly grated coconut or frozen grated coconut
4-5 red chillies
2-3 cloves of garlic
1 inch piece ginger
1-2 tbsp lemon juice
1 tsp mustard seeds
2-3 curry leaves
1 tsp oil
water to adjust consistency
salt to taste

For the idli:
  • Add oil to a heated pan, add mustard seeds and when they splutter add chana dal, cashews, red chilies  and curry leaves. Saute for a min and add the rava. Roast the rava until it changes colour slightly and smells good. Season with salt and take it off the stove.
  • Keep the idli plates greased and ready. Transfer the rava mixture in a wide bowl and mix in the carrots. Add the beaten curd to the rava mixture, add little water so that the mixture is of idli batter consistency. Pour the batter in the idli plates immediately and steam. If you dont have the conventional idli stand then you can make them in small bowls and place them in a steamer. The tip that I got is that once the curd is added, the batter must be steamed right away. In about 7-8 minutes delicious rava idlis are ready. Makes about 20-25 idlis.
For the chutney:
  • Grind together the coconut, chilies, ginger and garlic with some water into a smooth texture. Once you get the desired texture, add salt to taste and transfer into a bowl.
  • Now for the tadka, heat oil in a sauce pan and add mustard seeds, curry leaves and red chilies. Once they splutter, pour it into the chutney mixture in the bowl. Mix well and add lemon juice. Adjust the salt and mix well. The chutney is now ready! Enjoy with steaming idlis!